Week 6-8 One Room Challenge She-shed: lots happening, but not done!
I feel like I’m started every single one these blog posts with an exasperated “Oh my goodness, so much is happening!” And it’s true! This is my third season participating in the One Room Challenge and I’m realizing the interior, exterior, and deck area of my shed could take 3 cycles of ORC (24 weeks). And here I am trying to do it in eight!
But I’m glad for it. Having the accountability of the (somewhat) weekly check-ins and a deadline to at least share something have pushed this shed along further than it’s been in about two years. And although there’s been great progress since my last blog update, we’ve had guests in town two weekends back to back, making it just that much more challenging! Let’s recap. P.S. I definitely saved my favorite part for last in the update…
Weeks 6-8: Visitors, Purchases, Grunt Work, & 3D
In weeks 6-8, we’ve made lots of purchases towards the interior and exterior of the shed, gotten into some of the grunt work, I think best of all, I’ve started a draft 3D of the interior layout. And I’m in a state of fully embracing just keeping up progress and continuing to share until the entirety is done. Especially since everybody and their mother wants to come visit our property that is perpetually under construction. After every ORC wraps up, I feel like I’ve created a slice of heaven for myself to enjoy. And even though this shed is a LOT more work than just a couple gallons of paint, new furniture, and hanging artwork, I can really see where it’s going now.
More paint!
If you caught the blog post from week 5, you may know that I ran out of the Oleander pink paint that weekend. So the first order of business was to go and buy more paint and become one with the paint sprayer again. I am getting the hang of it!

After the last spray coat went on, I went around pulled back all the blue tape and protective plastic to start with the more detailed trim paint. As you might be able to tell from the photo above, I also got started on the white trim, completing that for the front of the shed. But little did I know trim painting could be a whole weekend on its own. Let alone with the 500 things also on the list for this makeover.
Making a plan for the pavers
Throughout this project, the pavers have been weighing on my mind the most. I’ve NEVER done a paver deck, but I think it’s incredibly important for the exterior design and will also provide so much use for us year-round. Especially when guests are here. We have plenty of dirt around clearly! So anything finished will feel like an upgrade.
However, leveling and volumes of sand are a big part of this. But starting with what I COULD do, I made a super quick plan to determine how many pavers I wanted.
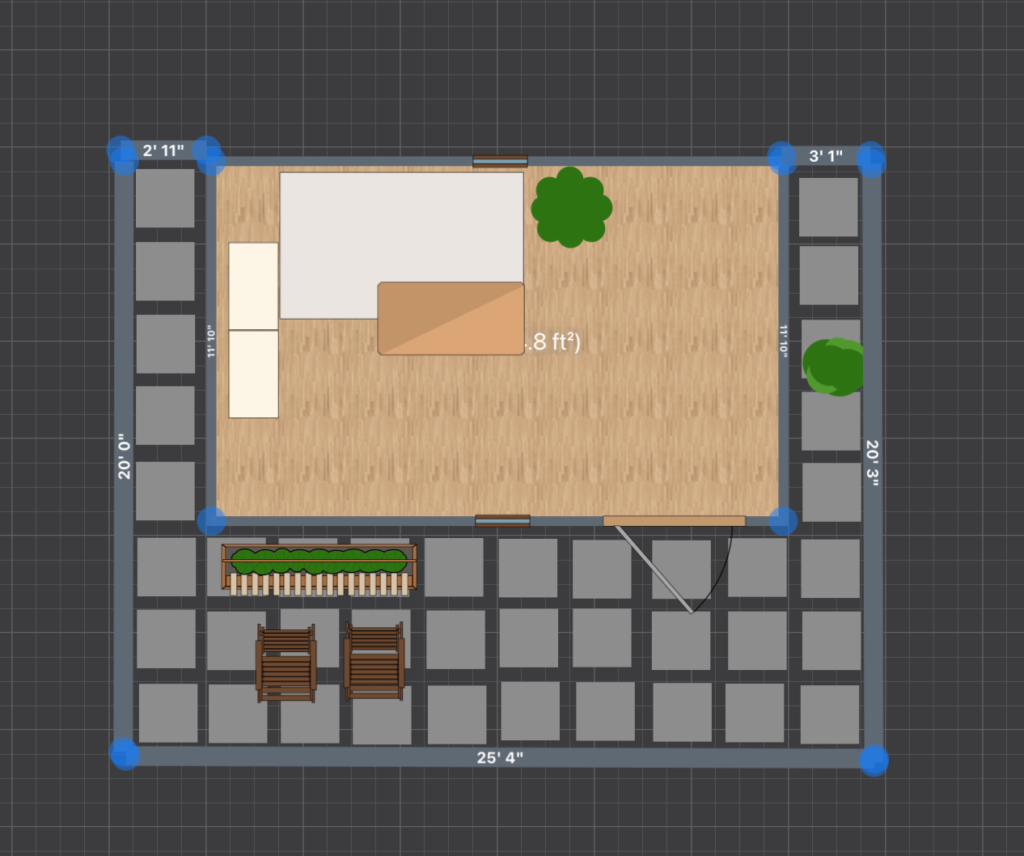
The other good news here, is that Renan has a plan for leveling the area more before we get started. But in the meantime, I did buy more matching pavers before our favorite spot closed for the holidays. Check that one off the list!
We decided to insulate!
I keep repeating this to anyone who will listen, but one of the biggest challenges for me in the shed is how much I’m needing to allocate time and money to “construction” details. Like I wish it was a makeover that just required new curtains, a new lamp, new rug, and a coat of paint. Those are things I can do practically in my sleep. But to finish the shed interior and exterior to even be worthy of decor, is a whole endeavor. And we’ve committed!
Budget wise, I was fully ready to skip on insulating the shed before we install the dry wall. I want new rugs and curtains for that kind of money! 🙂 But Renan discovered this foam core insulation at Lowe’s on one of his own projects (creating a house boat) and absolutely insisted we try it in the shed.
He liked how easy it was to cut to size. And since I spent what feels like 1/3 of my art school and internship days with a blade in my hands, I was unafraid! It has a little bit of a learning curve since every piece needs different cuts, but I got a few sheets of it installed already. I’ll try to get some pics to share in the next update.
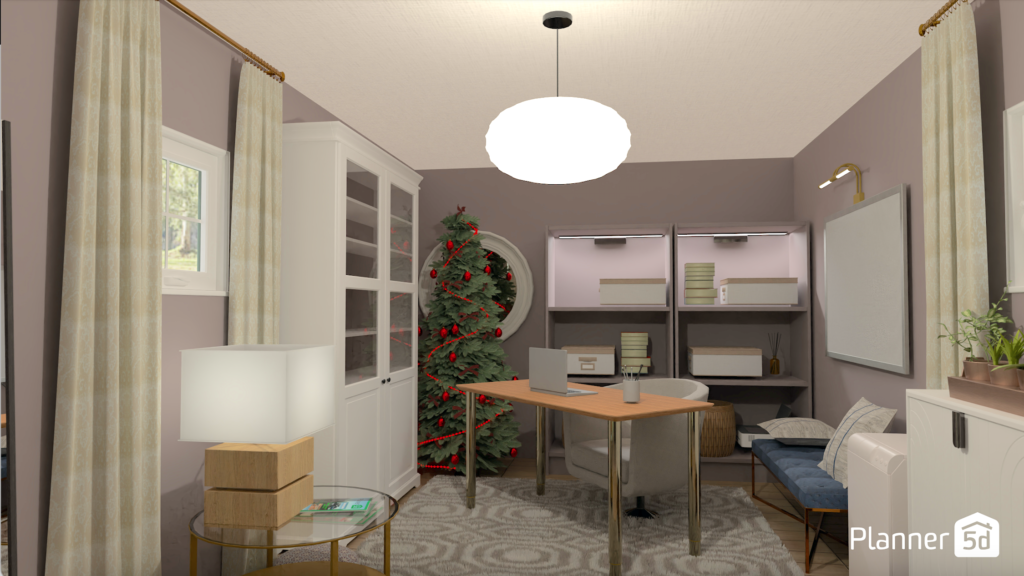
Last but not least, I started my 3D plan…
Ok, this I could write about for a century, but I’ll try to keep it relatively short. One of the best parts of starting the insulation was that it required some “let’s go ahead and declutter this and that” on my part. And it (Renan, also) asks the question of “where do I need outlets?” My feet were getting tired, so I decided to just let it rip on the 3D more yesterday and see where it went.
I realized that I’ve picked up/started 3D concepts for my she-shed at least three other times before this One Room Challenge, and yesterday was the most it’s come together in a really good bit!
It reminds me of my first One Room Challenge in my office at our previous house (rest in peace!) – likely because it has some of the same furniture and has various little zones in a medium size space. But introducing the color here… (this is using Sherwin Williams Coquina on the walls and the large bookshelf) makes all my “old” stuff, feel new! At least to me.
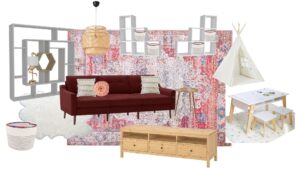
3D Interior Concept
And this is SOOO what I’m about as a designer. Getting intentional with what you have and making it feel a little more creative. Which sometimes means being cut-throat decisive about what’s NOT working. This design utilizes a close 3D catalog version of my same old large rug, upholstered bench, coffee table, white IKEA cabinets, storage dresser, and two mirrors. Also, an old bulletin board that I think would work great for fabric and wallpaper swatches. And a hand-me-down desk that has an adjustable height and is considerably larger than my old one. And lamps that have been collecting dust for longer than I care for!
As I mentioned earlier, a lot more budget is required for finishing the shed. So reusing as much of what I currently own is the name of the game!
I think getting this design whipped together is the push I needed to see how much can be done before the end of the year. Don’t get me wrong, there is SO much left to do, purchase, and install here. From new flooring, possibly more drywall, maybe some new lighting, maybe a cush new desk chair and obviously I’m jonesing for some new little accent rugs and curtain treatments.
And to put in my full-size Christmas tree would just be icing on the cake, spoken as a true December baby. Can I just skip Thanksgiving and keep working on my shed? A girl can dream!
Even though the technical ORC is done, more updates to follow!
What a packed update! And this took far longer than I expected to write but I’m really glad I did. I’d love to know in the comments what you think so far! And if you’re feeling inspired to get more intentional design in your life, we’re currently wait listing projects for 2024! Tap the free consult link to have a call with me and get yourself added to the list.
Until the next update! Thanks so much for reading and following along. Hope you have a wonderful week!
Disclaimer: All of my DIY blog content is for informational and entertainment purposes only. I share what works for me in my home, but you should consult with professionals/landlords before taking on any construction projects. My blog does not constitute interior design advice for readers. I am not liable or responsible for any damages resulting from or related to your use of this information.
About Kaitlyn

Interior design in Ocala, Tampa, & Gainesville, FL | Virtual design in U.S
Kaitlyn Loos [loh-s] is a virtual & in-person designer for interiors. She delights in collaborating with clients to bring contemporary, artful, and functional comfort into their homes.
With over 10 years of creative industry experience, Kaitlyn is a featured, national contributing design expert who also enjoys sharing tips online. With a BFA, she brings her knowledge of design principles, art history, and color theory to every project. And she continues to expand her knowledge of trends, products, and best practices to elevate every space she touches.
Kaitlyn specializes in helping clients choose quality materials for their homes; in addition to 3D design, wallpaper, decluttering and pattern mixing. Tap here to book a free 15-minute consultation now.


Leave a Comment